How to Start A Blog And Make Money
Hey blog fam! If you’re wondering how to start a blog and make money?
This in-depth post will guide you step by step, and help you get your new blog up and running in no time!
This post is all about how to start a blog that makes money.
You will learn
- A super easy way on How to start a blog and make money
- Where to get your web address(domain name)
- A solid and affordable web hosting company to store all your website files
- How to set up a self-hosted blog using WordPress
My recommendations
- Stay optimistic about your blogging journey
- Keep an open mind and be eager to learn new things
- Be ready to buy your domain(website name) and Lock it down
- Get started now, tomorrow doesn’t exist! When you get there it’s today again!
Skip the rest of this introduction and start building your blog!
Blogging For Beginners

When I began my blogging journey there seemed to be so many choices for starting a blog.
I had so many questions like- How to create a blog? What was the best web host? What platform should I go with? Choices-choices?
My research showed that it would be best to build a self-hosted website.
In short this type of website would be something you owned and could build into a saleable asset. Ownership is the key!
How Do I Self-Host A WordPress Site
To set up a self-hosted WordPress website you would need to choose a WordPress host for your site, purchase your domain name(website address) and install WordPress.
We will be doing each of these steps in this tutorial.
How Much Does it Cost to Start A Blog
This question will vary based on your goals. Blogging will have some expenses, and it’s best to use your budget on what’s most important.
That would be buying a domain, signing up for web hosting, and a small budget for miscellaneous.
- Blog hosting plan — $2.99/month (optional to pay annually in advance)
- Domain name — $8.88/first year cost
- Optional: email service — There are free options available that cover your first 1,000 subscribers
Which Hosting is Best For Website
Some of the different types of web hosting:
- Shared hosting-the most common type of hosting. You share a server with other websites.
- VPS hosting-this is a shared hosting, with additional resources available for you.
- Dedicated hosting-this type of hosting means that you have your own physical server reserved for your website.
- Cloud hosting-with cloud hosting, the hosting company will allocate a cluster of servers. Your files and resources are replicated on each server.
If this is your first website shared hosting will be good.
It will be the most affordable and require no technical know-how.
As you grow your site you will be able to scale up and jump into other types of hosting.
For our tutorial we will be using HostGator which is a popular web hosting company that many websites are powered by.
I am an affiliate with HostGator, the web hosting company I am recommending in this tutorial. I may earn a small commission from HostGator if you use my referral link to make a purchase (at no extra cost to you). See full disclosure here
My decision to partner with the folks over at HostGator and begin offering their services was not totally based on the opportunity to make money?
The reason why I partnered with HostGator was because I have been a client with them since 2015.
My first experience with creating websites was through HostGator.
I have several websites hosted with them, and must say- I am a satisfied customer.
I’m sure you will enjoy the same level of customer satisfaction (if not more) that I have received from HostGator over the past few years!
If you have any trouble at all setting up a blog with this tutorial, you can always contact me and I will help you get set up (free!). Just add “blog startup” in the message!
Get started with HostGator today!
This is a detailed tutorial and kind of lengthy. If you can’t finish it today you can bookmark this site and come back at your convenience.
So let’s start a blog, shall we?
How do You Start A Blog for Beginners
When it comes to blogging you will want to make sure you set yourself up for success from the beginning.
If you want to learn how to start a blog and make money I will share a simple formula for you to follow.
There are many different parts that all work together and when done right you can end up with a successful blog.
Essentially you will need two things to start your blog journey:
- Blogging Platform – This is the place you will add images, video, and write your blog posts.
- Hosting – Just like starting a “brick and mortar” business renting, or buying a location. You need to buy a space on the internet for your new blog to be set up.
Just below will take a look at how do you start a blog using one of the more popular platforms known as WordPress.org
This platform is designed for someone who has little to no experience in building websites.
You will need some dedication to learning and determination to build something great for yourself!
WordPress is known as a (CMS) Content Management System.
They provide tools needed to design web pages for browsing.
Using this template based platform you will be able to create your very own stunning website in no time, even with little coding knowledge.
Doing some research you will discover a number of other good platforms, and best free blogging sites such as Wix, Squarespace, Weebly etc.
While there is a place for these platforms, and blog sites they do not provide all the essentials that you will need to run a money making blog.
Starting A WordPress Blog
A WordPress blog will be perfect for creating your online presence.
To save time and potential hassle of moving your content from one platform to another we are starting with WordPress.org
FYI- WordPress.org and WordPress.com are two different blogging platforms. WordPress.com is NOT self-hosted, and will come with a few limitations.
When it comes to Content Management Systems (CMS) WordPress.org has a large share of websites designed on their platform.
This is huge because according to data from W3Techs.com WordPress powers about 38.8% of the websites across the web.
Followed by Joomla at about 3%. Shopify comes in at just over 1.5%. Drupal just over 1.5% and Squarespace at about 1.6%
The platform can easily be used by professionals using more robust features to build websites for clients, or a first time person new to the whole idea of building a website.
Beginners Guide to Start Your Blog
Here is my super easy to follow guide on how to start a blog and make money
Let’s get it!
- Choose your blog niche (what will you write about)
- Purchase your blog name (your online presence)
- Setup your web hosting (use my unique code for your discount)
- Design your blog (let’s find a great theme, plugins, etc.)
- WordPress dashboard settings(adjust permalinks, change passwords)
- Add content (write three to five initial articles)
- Install Google analytics(track your success)
- Grow and promote your blog (learn SEO, Pinterest, Facebook, Twitter)
- Monetize your blog (affiliate, ad networks, create a digital product)
1. Pick a Blog Niche
To niche down or not to niche down?
Having a blog niche would be helpful because this will allow you to create content that is focused on a specific audience.
Your blog is simply a way to have a conversation with someone about whatever your niche will be.
When you write for your audience you want to determine how you can best serve your readership.
Your audience will be able to find your content and be able to discover useful and meaningful solutions, tips, or ideas.
Here are a few topics that you may have an interest in talking about:
- How to Start a Blog
- Finance
- Lifestyle
- Education
- Parenting
- Beauty and Fashion
- Nutrition
- Recipes
- Health and Fitness
- Technology
- DIY
- Making Money Online
- Travel
- Relationship Advice
- Home Decor
Write down, on a sheet of paper, some topics you want to write about.
Don’t focus on a “niche” at this point, just write ALL the topics you wish to write about in your blog.
Once you’ve done that look at the list and cross out all the topics that you wish to write about, but you have no experience in.
You do not need to be an expert to blog about a topic, but you should have some knowledge, and be passionate about it at least.
Out of the topics that are left now, try to find a pattern. Is there a way to connect the topics somehow under one umbrella topic?
Try to find a way to somehow relate the topics your interested in. They can fall under an umbrella with the main theme as your niche.
PRO TIP– don’t overthink this part too much. You don’t want to waste to much time researching and not taking action!
Here’s a great discussion from Neilpatel.com about choosing your blog niche.
2. Purchase Your Blog Name
This step is easily solved.
I am including a link to purchase your domain name in this section.
This will be one of the small but super important and must complete investments in your blog.
You can secure your website name for less than $10 for the first year.
Your domain name is like your address to your local shop you’re opening.
In order for customers to visit your brick and mortar business they will need your store/shop, or business address.
A domain name is your virtual address.
When it comes to blog names, you should pick something easy.
Easy to say, easy to spell, easy to remember. Preferably something that resonates with your audience.
Pick a blog name that says what your audience will learn from your blog.
Examples: blogstarter, or passiveincomeideas each reveal what you will learn about when you land on these websites.
My website domain address is blogtips.uk-With this name my goal was to tell my readers what they will learn from my site.
You can use your name as the face of your blog like these well known examples:
Neil Patel, Taylorstanford, or Elnacain. You can also give your name a creative spin.
For example, whatskatieupto (Katie Grazer) The thing about using your own name for your blog is that you’ll be the face of your business.
You will build an audience with your content so if you choose your name or a likeness things will work out.
One last reminder on this would be to look for a “.com” extension. These are more common on the web.
Head over to NameCheap to purchase your domain name.
3. Start Web Hosting
Have your domain info handy i.e. : your domain name that you purchased from NameCheap. Starting your hosting with the right company is important.
Your hosting plays a huge part in the performance of your website.
We will start your hosting with HostGator.
For this tutorial go ahead and get signed up with the Hatchling Plan it’s $2.99 per month with an option to sign up for multiple years in advance.
There are plenty of other hosting companies out there, and every blogger recommends there favorite.
HostGator is a good choice for bloggers (especially newer bloggers)
In 2015 I was a Total newb- and I had come across a particular YouTube video that was pretty easy to follow.
I went through the tutorial and ended up creating my first website that same day!
I have been using HostGator ever since then, and have ZERO complaints.
The customer support has been great. I haven’t had any issues of my websites being down, and my websites have decent load times.
On one occasion I completely crashed my website, and the only thing showing up was unreadable text.
Without hesitation I jumped on the phone with HostGator support and they were able to get my website back online.
So my experience with HostGator has been all (Gee- double-O- dee) good!
Selecting your Hosting Plan
At this point we are ready to start your hosting plan.
With HostGator plans you have 3 choices.
- Hatchling Plan
- Baby Plan
- Business Plan
The Hatchling Plan is suitable for starting a blog.

If this is your first experience with hosting I would suggest this plan so that it is both cost effective and gives you access to learn the HostGator website and cPanel.
For those of you who are a bit more experienced and have plans to create multiple websites, or you already have more than 1 website you can select the Baby Plan.
I have the Baby Plan and it allows you to create an unlimited number of websites. Useful for building sites for friends or family.
The Business Plan is a great option if you plan to build sites for your clients.
You get a dedicated IP and unmetered bandwidth. As your sites grow in traffic this plan will be suitable.
The screen shot below will be an exact image of what you will see when you click the link and head over to HostGator.
For this tutorial remember we are starting your hosting with the Hatchling Plan.
You can always make changes later as you see fit, to other HostGator options. Don’t forget your discount!
Add Coupon for Discount on Hosting
Make sure to add this coupon code GETBLOGTIPS on line 6, and no need to sign up for any extras at this point.

After selecting the Hatchling Plan you will be brought to this screen for your domain selection.
Remember based on this tutorial we have opted to purchase our domain separate with NameCheap.
What we need to do here is simply enter our domain and select “I Already Own This Domain”
NOTE: if you have selected an extension other than .com you can change it here ex: .NET, .org, .co.uk

You will need to select your package type here billing cycle and complete your account details.

This is your billing details that can be changed at anytime.

Almost!
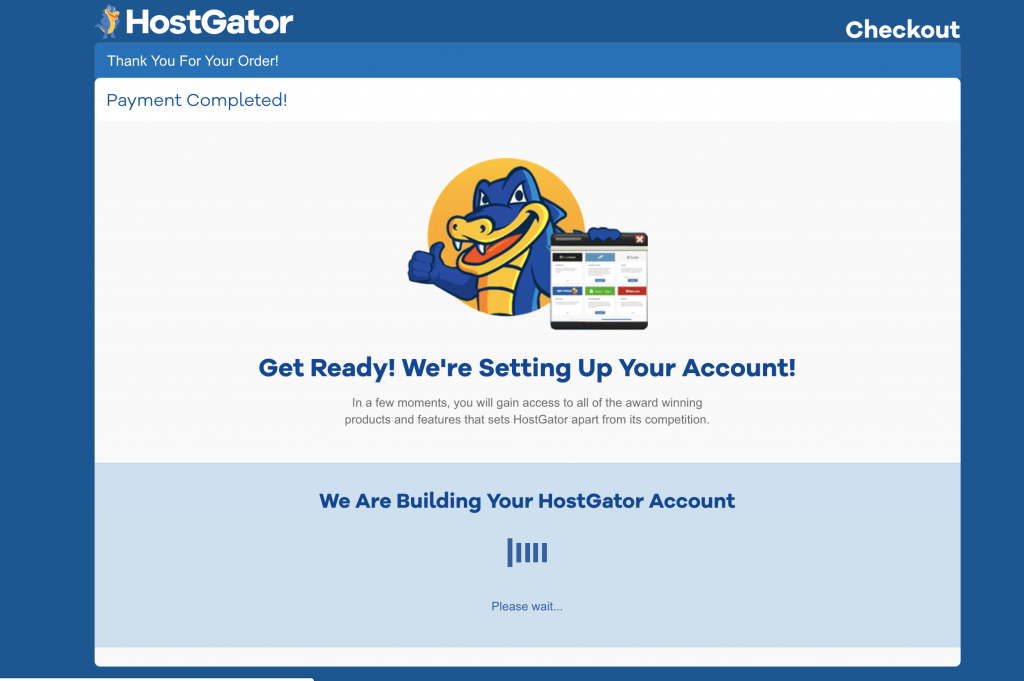
Once this completes you will receive a welcome email from HostGator that will include your login details for your CPanel and include your Nameservers which we will need in this next step

The HostGator Login Panel

This is your dashboard, here you will be able to keep up with your account and log in to your cPanel (control panel)

Click the launch cPanel icon to get started
We need to install WordPress. HostGator has an easy one-click install option to complete this task.
Select the WordPress installer.
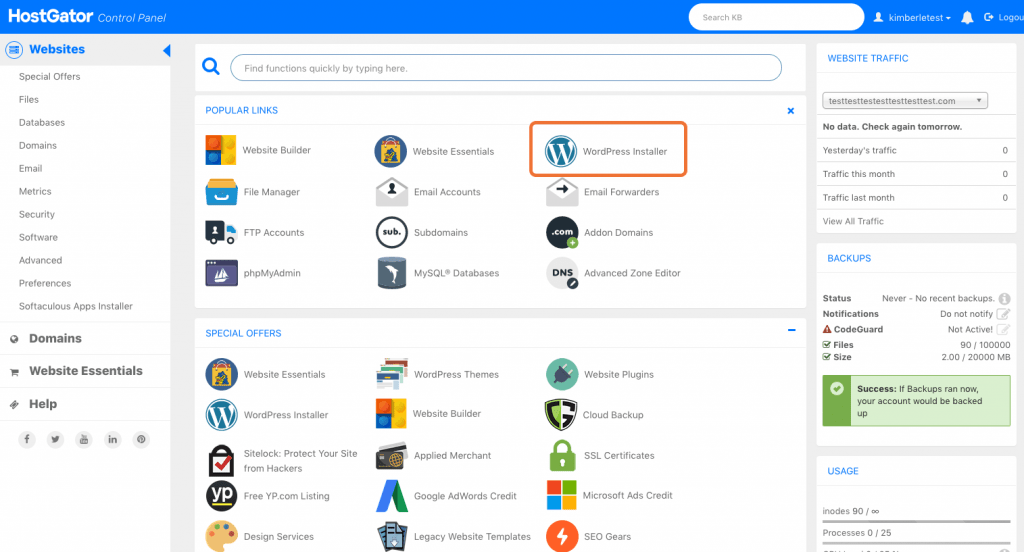
Next click the drop down so we can tell WordPress the domain we are working with.
Select your domain from the list and click next.

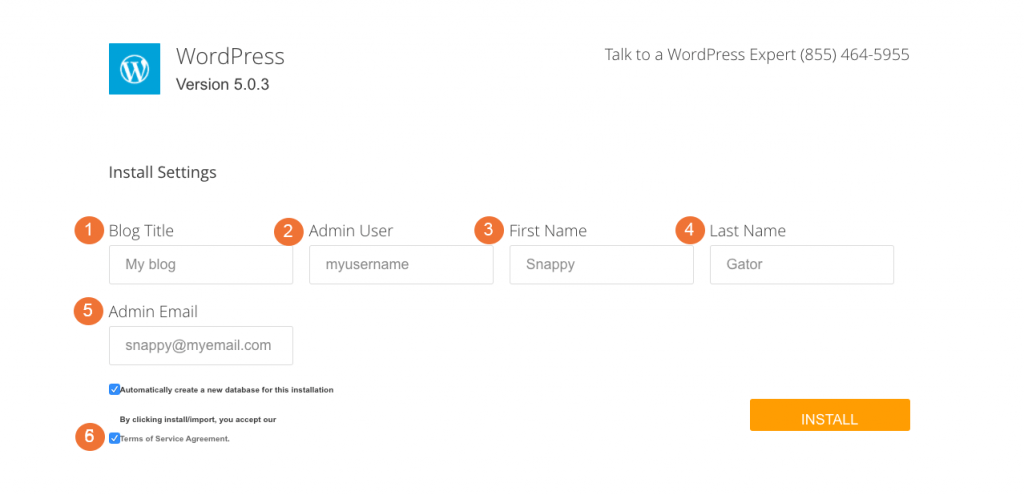
Enter Your Website Details
- The title of your website can go here
- Your username
- Your business or first name
- Business or last name
- Make sure to add an email. This will be used for important communications
- Tick the box to agree with the TOS then click install
In a few moments you will see the installation complete message.

Let’s log in to your WordPress backend (dashboard) make sure to grab your username and password you will need this. We can change the password later

Welcome to your WordPress dashboard. Here you will edit your blog posts, choose a theme, design your website, change your password, and add plugins.

FYI it is possible to get your domain from HostGator (your hosting company) I don’t recommend that, but it is a choice.
I recommend- not buying your domain name from your web hosting company.
Purchasing your domain name separate from your hosting company provides an extra layer of security for your domain.
Of course as you progress in your blogging journey you will be able to decide what method works best for you.
Changing Your Nameservers
After purchasing your hosting plan and completing your WordPress installation you will need to go over to your NameCheap account and point your domain Nameservers to HostGator.
Where do I find my Nameservers?
How do I point the Nameservers to HostGator?
Your Nameservers need to be set with your web hosting company.
Since we purchased the domain from NameCheap we will need to enter our HostGator Nameservers to ensure our website is being displayed on the web.
You will receive a welcome email from HostGator and it will contain your Nameservers. See screenshot for reference:

Go over to your NameCheap account. Hit the Dashboard tab and locate your domain.
In the Nameservers section click “manage” then choose “custom DNS” On lines 1 and 2 enter the Nameservers as shown in the example- 1st Nameserver, 2nd Nameserver.


Copy and paste them on each line then click the green checkmark to save and that’s it!
PRO TIP- allow some time for your website to become active with HostGator.
When changing Nameservers it can take anywhere from 2 to 24 hours to complete.
FYI-If you purchased your domain with HostGator you do not need to change the nameservers.
Changing your Nameservers is only needed when you did not purchase a domain with the hosting company.
You will just need confirm your account and complete the setup using the above screenshots.
4. Dive Into Your WordPress Dashboard
At first glance you may feel a bit intimidated with your WordPress dashboard.
The following is an introduction to the sections you will spend most of your time in, and I promise you that this will become an easy to navigate process!

Here are the sections you will spend most of your time in:
Posts
This is where you will write, edit, and publish your content.
I find it easy to create a draft and start writing a new article as I find new ideas.
Your articles should be organized by categories. This will help people find specific topics they are most interested in.
My blog is all about tips for bloggers, I have a few categories such as:
- Blogging
- Blogging resources
- Pinterest Tips
- Website Optimization
This also creates a uniqueness to your blog, so feel free to add as many relevant categories as needed!
Pages
A page may look just like a “post” however a page is for your “static content” This would be information that stays the same for longer periods of time.
- Contact page (this is set so people can contact you}
- About Me page (this page tells people what they will get from reading your blog)
- Legal pages (your privacy policy, affiliate disclosure, etc.)
You will create a menu that will give visitors easy access to view these pages.
Comments
This section is where you will find comments that readers leave on your articles.
This area allows you to approve a comment before it becomes public.
You can also delete unwanted comments, and respond to your readers with a comment of your own.
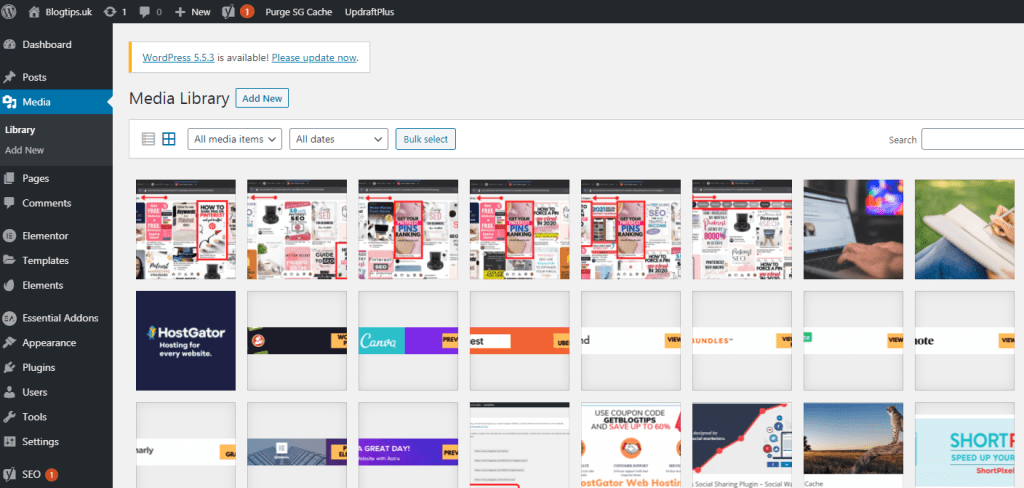
Media Library
The media library is where all of the images that you upload to your blog are stored.
Appearance
There are several customizations you can make in this section. Things like adding your theme, creating a menu for your header or footer
Plugins
Plugins are used to add functionality to your website.
Like downloading an app to your smartphone that will enhance a particular feature you like to use.
There are over 50,000 plugins both free and paid. Chances of you finding a plugin to add a specific function is pretty much definite.
Users
This section is where you find your login details.
You can add a user if you are sharing access to your website with someone. This is usually if you decide to hire someone to design your site.
Settings
The settings area is pretty straight forward. Here you will be able add your site title, change what is displayed on your home page, and even change time and date settings.
When it comes to WordPress you will learn more as you do more.
Getting familiar with your dashboard, and all the settings you will be using is something that will take some time, just remember you will learn as you go.

5. Design Your Blog
Here is where you start to create your online identity aka: your website branding!
There are tons of places to find FREE and PREMIUM WordPress themes to make your blog look beautiful.
Having a beautiful, organized, and branded website keeps your readers coming back for more.
Choose a theme that’s clean, easy-to-read, and is customizable for you to change your logo, colors, and other fun things.
If this is your first-first experience with a website I would suggest a simple theme that has demo content that you can install then switch out the demo stuff with your own.
Astra is a good start and has lots of FREE templates you may find appealing.

The easiest way to get your first theme up is head over to your WordPress dashboard.
On the left pane which is your menu pane, scroll down to appearance and select it then select “themes”
You can search for a theme here.

WordPress Plugins
To add functionality and style to your blog you can use plugins.
What is a plugin?
A simple answer is-plugins add functionality to your website.
Like downloading an app for your smartphone to take better pictures and have access to smart editing features.
In your dashboard menu pane select plugins then “add new” Any plugin you are interested in you can use the search option.
Simply type the name of the plugin. When it pops up click “install now” and then “activate”

This is my shortlist of some of the more important FREE plugins to add to your website.
- Yoast SEO – With this plugin you can optimize your blog for SEO easily, which will help you boost your search engine rankings and increase traffic to your site.
- Askimet-spam protection
- Wordfence Security-malicious activity protection
- UpdraftPlus-simple website backups
- WP Fastest Cache-caching for your website
With plugins you can find the tools needed to create the perfect website.
Permalinks
Permalinks are what you see in the address bar of a web browser. We are changing the structure to a simple looking format.
Instead of your site reading https://yoursite.com/@&#$25
it will read: https://yoursite.com/about-me-page
See the difference?
From your WordPress dashboard go to settings in the left side panel then select permalinks.
On the permalinks settings page make sure to choose Post name structure and save changes

6. Create Blog Content
You want to write content that turns website visitors into fans.
People who come back to your website over and over because they find your content to be useful and meaningful.
It would be great if you already have some ideas for content sketched out at this point but if not here are a few ways to generate some ideas.
let’s start creating your content!
Method one: You can do a Google search on your topic ideas. Take a look at your biggest competitors and get content ideas from them. We don’t copy other bloggers!
You can learn by reading other websites what type of content people are interested in reading by looking at the top sites on Google search.
Method two: Think of teaching something of value and break it up into different parts. This can be done and give you enough content ideas for five-ten posts.
Method three: Make a list of keywords and search for topics related to them.
Doing proper research you can find topics that people are interested in and write meaningful and useful articles around your research.
7. Install Google Analytics
Google Analytics is an awesome FREE tool that you will be able to track your websites results.
Knowing your analytics will help you to learn more of what’s working and make improvements to your site.
It’s easy to get a Google account started and remember it’s FREE!
I must admit I kind of geek out with numbers, and seeing people visit my website was pretty kool.
One of the features of having an analytics account is you can see visitors in real time.
Google shows you what part of the world people are visiting your site from, and even shows you the blog posts they are reading.
This is a must have tool.
Here’s a step-by-step guide to help you get started!
8. Promote Your Blog
One thing I learned really quick was having a great looking website means nothing?
With a new blog nobody knows you exist. Your primary goal at this point is to promote, promote, promote!
Many bloggers drive traffic to their site using Pinterest.
Pinterest can be a good start for bloggers because it’s a visual search engine and not just another social media platform.
It’s where you can create pins that have links to your blog posts.
When someone uses Google to search information they enter a term or phrase related to the search and Google gives them the best results.
That’s how Pinterest works so your pins that are optimized for Pinterest search can be found.
While you may be able to get some exposure with Pinterest you should also learn SEO. Search Engine Optimization.
This is basically creating content that Google deems the highest quality and most relevant to a searchers query.
This type of promoting is powerful once you begin to receive search engine traffic.
It will take time to learn the process and also for Google to know all about your website.
Since it may take some time for you to get that Google traffic don’t worry
I got you!
I will link to a great source for other ways to promote your new website below.
9. Make Money With Your Blog
There are a number of ways to monetize your blog. The most common ways to make money with a website would be:
- Affiliate Marketing-selling someone else’s product for a commission
- Ad Networks-displaying ads on your website/some networks have minimum pageviews as a requirement
- Selling your own products or services-can be lucrative because you own the product and control costs
For more information on how to start a blog and make money, take a look at the resources below.
Related reading:
- Writing A Blog Post
- 7 Ways to Make Money as A New Blogger
- 10 Best Ways to Promote Your New Website
- Page speed
In conclusion on How to Start A Blog That Makes Money

After reading our post we hope you were able to learn more about the subject of how to start a blog that makes money.
Make sure to check out the “related reading” section just above to learn more about setting up your new blog!
Having your own website is a great way to build your online presence.
If this post was useful and helped you to start your website give us a shout out in the comments!
Now over to you
I’m curious? Are you new to creating websites?
Would you like to learn more about how to start a blog and make money?
Feel free to leave a comment below, we’d love to hear from you!







7 Responses
Very helpful post and tips, thanks
https://thepowersblogging.com/
Thank you for reading!
sounds good, I still want to do a 3 blog since my 2 failed miserably maybe the topic wasn’t as right as I thought. so will follow the tips to see next one maybe could be lifestyle and beauty things I like a lot and want to share with others too.
I would say most of us failed with our first attempts Lol! I know I did, we learn from what we did and come out with a better plan for sure. Make it happen!
very helpful thank you
Thank you for stopping by!
Hello,
Always a great read.
Incidentally I am right now trying to establish the best day/time for my posts.
I read somewhere that Monday morning wasn’t the best time. So i think I can understand why you may have found that Tuesday morning works.
In fact I think thanks to this post, I already have my answer now as to the best day/time for my weekly posts. I had earlier experimented with Friday evening but that didn’t get many engagements.
Thanks once again for these awsome posts and your great insights.